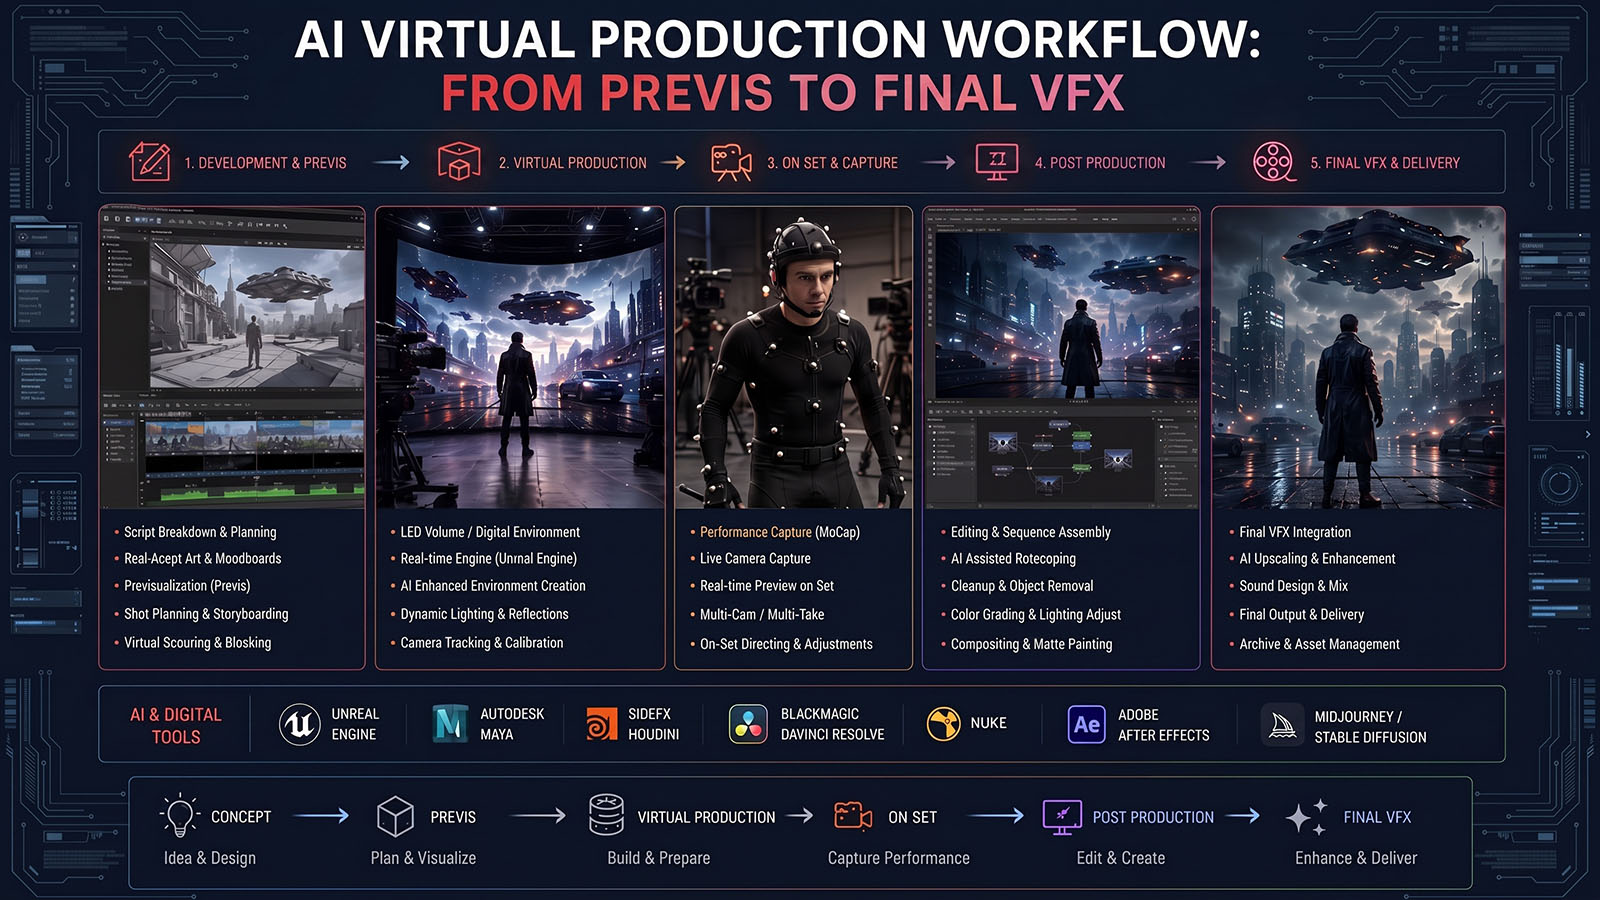


A practical production pipeline for combining AI characters, environments, motion capture, virtual cameras and real-time 3D—then finishing the shot with traditional VFX and compositing.
- The complete pipeline
- Step 1 — Define the shot
- Step 2 — Build AI previs
- Step 3 — Build characters and environments
- Step 4 — Set the virtual camera
- Step 5 — Capture performance
- Step 6 — Assemble the real-time scene
- Step 7 — Shoot or render
- Step 8 — Composite and finish
- Quality-control checklist
- Common problems
- FAQ
The complete AI virtual production pipeline
The central idea is simple: AI should accelerate decisions, not remove decisions. Build enough structure early that you can reproduce a shot, change a camera, adjust a performance and keep continuity across multiple shots.
Step 1 — Define the shot
Before opening an AI generator, write down what the shot must accomplish.
| Question | Example decision |
|---|---|
| What happens? | A digital character walks into a live-action street. |
| What is the camera doing? | Slow handheld push-in. |
| What must be real? | Actor, street plate and practical lighting. |
| What can be CG? | Character, extension and background elements. |
| What is the final frame? | 4K cinematic shot with shallow depth of field. |
This prevents the common AI problem of generating beautiful images that cannot be assembled into a consistent sequence.
Decide the camera before you spend time building the world. A world that looks great from one angle may fail completely from the final shot’s camera.
Step 2 — Build AI previs
Use AI to explore the shot before committing to detailed assets. Generate rough characters, environments, compositions and mood references.
Flow Studio’s current 3D Editor is designed around this idea: rather than prompting an isolated video, you assemble an editable scene with characters, worlds, animations and cameras, then refine it through Canvas.
Unreal Engine is also designed for previs and filmmaking workflows, with real-time environments and dedicated virtual-production tools spanning location scouting, previs, on-set production, postvis and final pixels.
Previs deliverables
- Shot framing
- Character positions
- Camera movement
- Approximate environment
- Performance timing
- Cut timing
Step 3 — Build characters and environments
Once the shot works in previs, replace rough elements with controllable assets.
Flow Studio’s Wonder 3D can generate editable 3D characters and objects from text or image prompts. Its April 2026 AI Rigging update then extends generated characters into animation workflows.
For environments, AI can rapidly explore locations, but camera-critical areas should eventually have reliable geometry, scale and lighting information.
↓
3D ASSET
↓
TEXTURE / MATERIAL
↓
RIG / ANIMATION
↓
REAL-TIME SCENE
↓
FINAL SHOT
Step 4 — Set the virtual camera
The camera becomes the bridge between previs and production. Establish focal length, framing, height, movement and timing.
Flow Studio’s 3D Editor supports editable cameras and camera movement, including independent and character-relative camera setups.
In Unreal Engine, the virtual-production toolset supports camera and real-time filmmaking workflows, including in-camera VFX.
Camera checklist
- Focal length / field of view
- Camera height
- Subject distance
- Camera path
- Depth of field
- Motion blur
- Horizon and perspective
Step 5 — Capture performance
For digital characters, performance capture can provide the movement that drives the animation. Flow Studio currently supports body, face and hand motion capture from footage without requiring traditional suits, markers or stages.
Unreal Engine 5.8 also introduced advances in full-body performance capture and character/animation creation.
Use clean reference footage: keep the performer visible, avoid unnecessary occlusion and make the action readable.
Step 6 — Assemble the real-time scene
Now combine the character, environment, camera, lighting and animation into a controllable scene.
The advantage of a real-time scene is immediate feedback. Unreal Engine’s current film/TV workflow highlights real-time environment updates, Lumen lighting and Nanite geometry for high-quality scenes.
Flow Studio’s new 3D Editor provides a similar scene-first philosophy inside an AI-focused workflow: assets remain part of an editable scene instead of being treated as isolated generated clips.
Step 7 — Shoot or render
There are two main routes.
| Route | Use it when |
|---|---|
| Virtual / real-time shoot | You need live camera, interactive lighting, actors and real-time backgrounds. |
| Post-production CG | You want maximum control and can build the final shot after filming. |
| Hybrid | You need physical plates plus CG characters, environments or extensions. |
For an LED workflow, the real-time scene can drive the background and interactive lighting. For a post workflow, the tracked camera and CG scene can be rendered separately and composited later.
Step 8 — Composite and finish
Virtual production does not eliminate post-production. It changes where some decisions happen.
+
CHARACTER PASS
+
SHADOW / CONTACT
+
ATMOSPHERE
+
DEPTH / MOTION BLUR
↓
COMPOSITE
↓
COLOR / GRAIN
↓
FINAL DELIVERY
Use compositing to unify the image: match exposure, color, grain, depth of field, motion blur, atmospheric perspective and lens characteristics.
Quality-control checklist
- Can the shot be reproduced from the saved scene?
- Does the camera remain consistent?
- Does the character maintain identity and proportions?
- Are feet and contact points believable?
- Does lighting match the real plate?
- Do shadows fall correctly?
- Does the environment have correct scale?
- Are textures stable between shots?
- Does motion blur match?
- Does the final composite retain natural grain and lens response?
Common AI virtual-production problems
| Problem | Cause | Solution |
|---|---|---|
| Character changes between shots | Generative inconsistency | Use a persistent 3D character and controlled scene. |
| Camera feels different | Prompt-based generation without camera structure | Use editable cameras and a tracked/defined lens. |
| Environment scale feels wrong | 2D generation without spatial reference | Build a 3D environment or establish measurements. |
| Actor and CG do not interact | No contact/shadow/occlusion logic | Add tracking, shadow and depth integration. |
| Beautiful previs fails in final | Previs ignored production constraints | Test camera, asset and lighting requirements early. |
Prompt → Generate → Forget is the weak workflow. Build → Direct → Iterate → Preserve scene structure is the stronger production workflow.
AI virtual production vs traditional production
| AI-assisted workflow | Traditional workflow |
|---|---|
| Rapid exploration | More predictable from the start |
| Fast asset generation | Artist-built assets |
| Fast previs | Established previs pipeline |
| Needs consistency control | Known continuity methods |
| Can reduce repetitive setup | More specialist manual work |
Recommended Zgian workflow
This is the important distinction for Zgian: AI is not the replacement for the VFX pipeline. It is becoming a new acceleration layer inside it.
Frequently asked questions
What is an AI virtual production workflow?
It is a filmmaking workflow that uses AI to accelerate previs, characters, environments, animation, motion capture, tracking or shot development while retaining editable scene and camera control.
Can AI virtual production replace an LED wall?
No. AI can accelerate many parts of virtual production, but an LED volume provides physical backgrounds, interactive lighting and on-set in-camera VFX capabilities that AI generation alone does not reproduce.
Can I use Unreal Engine with AI virtual production?
Yes. Unreal Engine is already a major virtual-production environment, and its 5.8 release adds further advances in virtual production, character/animation creation and performance capture.
Is Flow Studio a replacement for Unreal Engine?
Not necessarily. Flow Studio is focused on controllable AI-assisted VFX and early shot development, while Unreal provides a broader real-time production environment. Flow Studio can also export scenes to Unreal and other 3D applications.
What is the biggest advantage of AI virtual production?
Speed of iteration. You can explore characters, environments, performances and camera ideas much earlier, then preserve the useful structure instead of rebuilding each shot from scratch.
Continue the Zgian AI + VFX series
3D Generalist & VFX Professional · About the author →